Hello Swit chums,
How was your weekend. Mine was super fantastic. Just for info, I was out of town to celebrate my First Marriage Anniversary. I could actually get my IPL crazy hubby for a weekend away... It was simply superb. And hence my absence from my blog and also visiting others blog. I am sure I have missed many things but will catch up soon...
Meanwhile, I wanna share this card I made for Yumz on our First Anniversary. They say Paper and Clock are the traditional gifts for First Anniversary. What better that a hand-made card.
To begin with, this is not a high fundu card. It's a simple card made with whatever I had hand. Also it was a surprise for him and hence, made this card when he was not around. I initially thought of making a simple card. But then these wonderful Fold card styles at Lulupu helped me to think something different and hence I made a plus sign '+' card.
Without me being more wordy, please find below my card with additional remarks.
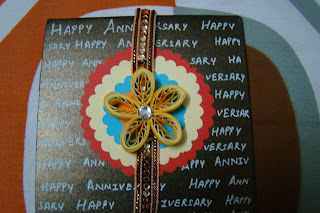 This is the first snapshot. If you see, it's a copper color cardstock I have used. It has a metallic finish to it which looks quite good for this occasion. I made a band of a copper color lace with a quilled flower stuck to it. This band keeps the card folds in place.

Once we move the band, the card looks as above. Since I don't own a Scallop punch yet :(... I hand cut the circles in different color papers with designer scissors. Surely You can see the circles are not to the mark but still acceptable. Moving on, I used a White pen for simply writing down 'Happy Anniversary'. White looks good on this metallic finish. And a simple 'YD'....
Moving on to my first flap,
 I simply stick a Pink color paper on the cardstock. Then I randomly selected some color quilling strips and stuck them in different angles and wrote down one liners in different color pens. As you can read here, 'Loving - Always and Forever'; 'Smiling and Happily ever after'; 'Having a Pillow fight in the bed'; 'Awesome Badminton Challenge won (By D)' and so on.... Please don't mind my finger holding down the card....
My second flap is,

I stuck a blue cardstock and then I used a cardstock I ordered from LULUPU... It's a cute cardstock.. Just cut out a sentiment which says "Life is".. and then I added words in my calligraphic style as With you, Life is.... 'Beautiful', 'Wonderful', 'Darling', 'Shona', 'Smiling', 'Happy', 'Classy', 'Sexy'... and so on as you read here....
My next flap is

The center CS is again from LULUPU. I cut out a square and stuck it in a diamond shape. I then added these embellishments I bought from a local store.. They look cute here....
My last flap,

I had seen this technique when I was a kid and my sister's friend was doing this. She simply moved her paper over a candle and what you get is Black prints like smoke. Here, I even moved my finger over the entire smoky look else it would have left marks on my copper CS and hence you see a greyish white look. Accidentally, a dot of wax fell on my smoke print and I liked it. Hence, I did it on purpose for other wax dots. It just gives a simple yet different look than my other flaps.
And now the center card look,

I had this Heart shape punch outs with me. I colored the heart in different colors to add some colors on this center card as I have used only white mostly here. I thought to add it in the center and then stuck some white color velvet flowers I got locally. They just add uniqueness to the already cute heart. Also, I gave this 'White Stitch' look border to this center CS. It's cute, infact according to me, the best part of the center card.
And here's the look of the overall card,
 The band in the corner, the four flaps out and the center Heart. A plus '+' sign card.
Some more pics here,
 The pink flap with the random one liners..... I have purposefully used a pink because I love pink and Yumz just loathes it.... heheheheh... Just to tease him!!!

The calligraphy style I used is 'self learning'. Yumz love my handwriting. So thought of adding it here.

The center Colored heart.....
 The cross look of my quilled flower. I made these flowers just to try a technique and it looks good I think. I am not sure if any quiller out there has tried this technique. If so, I would love to see it... Cause I loved this style.. Just cute. I made it in Pink and Blue shade as well..
I hope you liked this card. As I said, It's a simple card. What matters is the emotions and love put in it while making... And about Yumz, he is bowled over with this card and then, CSK winning the First Eliminator match on the 23rd May, 2012. Oh BTW, we celebrated our First Marriage Anniversary on the 21st May, 2012. It was a fun weekend...
Cya dolls.. Keep coming back!!!
How was your weekend. Mine was super fantastic. Just for info, I was out of town to celebrate my First Marriage Anniversary. I could actually get my IPL crazy hubby for a weekend away... It was simply superb. And hence my absence from my blog and also visiting others blog. I am sure I have missed many things but will catch up soon...
Meanwhile, I wanna share this card I made for Yumz on our First Anniversary. They say Paper and Clock are the traditional gifts for First Anniversary. What better that a hand-made card.
To begin with, this is not a high fundu card. It's a simple card made with whatever I had hand. Also it was a surprise for him and hence, made this card when he was not around. I initially thought of making a simple card. But then these wonderful Fold card styles at Lulupu helped me to think something different and hence I made a plus sign '+' card.
Without me being more wordy, please find below my card with additional remarks.


Once we move the band, the card looks as above. Since I don't own a Scallop punch yet :(... I hand cut the circles in different color papers with designer scissors. Surely You can see the circles are not to the mark but still acceptable. Moving on, I used a White pen for simply writing down 'Happy Anniversary'. White looks good on this metallic finish. And a simple 'YD'....
Moving on to my first flap,

My second flap is,

I stuck a blue cardstock and then I used a cardstock I ordered from LULUPU... It's a cute cardstock.. Just cut out a sentiment which says "Life is".. and then I added words in my calligraphic style as With you, Life is.... 'Beautiful', 'Wonderful', 'Darling', 'Shona', 'Smiling', 'Happy', 'Classy', 'Sexy'... and so on as you read here....
My next flap is

The center CS is again from LULUPU. I cut out a square and stuck it in a diamond shape. I then added these embellishments I bought from a local store.. They look cute here....
My last flap,

I had seen this technique when I was a kid and my sister's friend was doing this. She simply moved her paper over a candle and what you get is Black prints like smoke. Here, I even moved my finger over the entire smoky look else it would have left marks on my copper CS and hence you see a greyish white look. Accidentally, a dot of wax fell on my smoke print and I liked it. Hence, I did it on purpose for other wax dots. It just gives a simple yet different look than my other flaps.
And now the center card look,

I had this Heart shape punch outs with me. I colored the heart in different colors to add some colors on this center card as I have used only white mostly here. I thought to add it in the center and then stuck some white color velvet flowers I got locally. They just add uniqueness to the already cute heart. Also, I gave this 'White Stitch' look border to this center CS. It's cute, infact according to me, the best part of the center card.
And here's the look of the overall card,

Some more pics here,


The calligraphy style I used is 'self learning'. Yumz love my handwriting. So thought of adding it here.

The center Colored heart.....

I hope you liked this card. As I said, It's a simple card. What matters is the emotions and love put in it while making... And about Yumz, he is bowled over with this card and then, CSK winning the First Eliminator match on the 23rd May, 2012. Oh BTW, we celebrated our First Marriage Anniversary on the 21st May, 2012. It was a fun weekend...
Cya dolls.. Keep coming back!!!

.jpg)

.jpg)

.jpg)


