Friday, December 28, 2012

Hello Swities

Hello Dearies,

I am back. Obviously it took me longer but than someone who has had a shift/change of location can understand which boat I am traveling in. And in my case, I have had a shift of an entire continent, albeit country.

For starters, as i mentioned in my last post, I have shifted to Canada with my Yumz. For now, we are doing good. Obviously, before our immigration, I have had my share of worries and butterflies in my stomach for days, but now when I look back, it feels it has been good. And now we both look forward to our new found home, Canada. It is a wonderful country. Wonderful locations, wonderful houses and awesome traffic sense. People here are also very helpful. While walking on pedestrians lane, you smile at strangers and they smile back with a courteous concern. It feels good. But then, now, winter has started. Honestly, I didn't enjoyed walking in snow as much as I thought I would. And so, every coin has two sides. I think I belong to the group of people who thinks the glass is half filled rather than worrying about the part which is half empty..
 
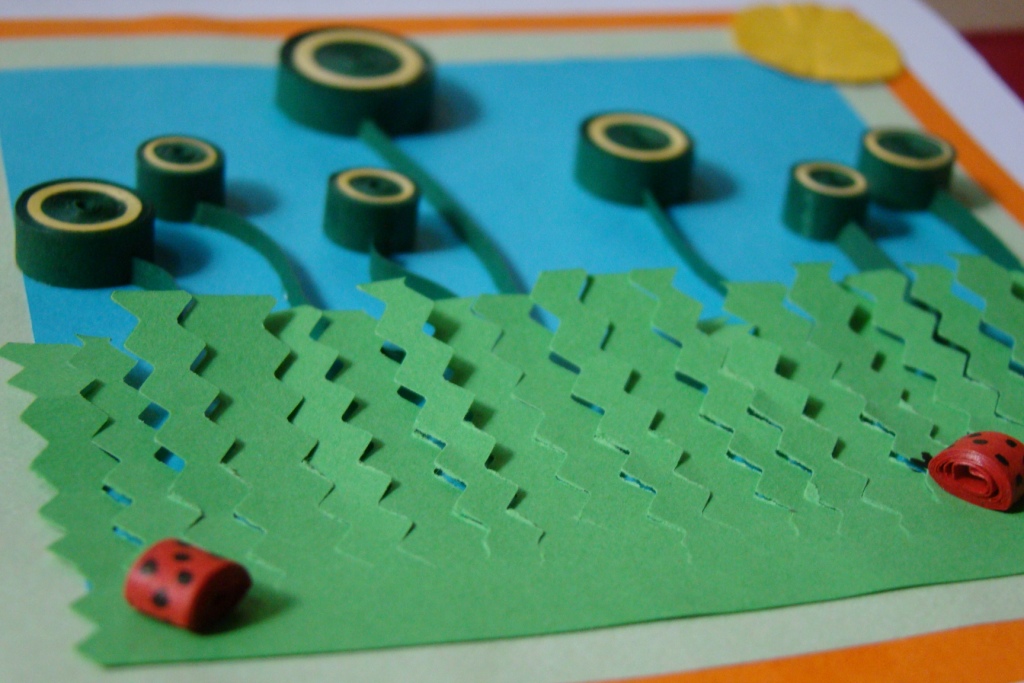
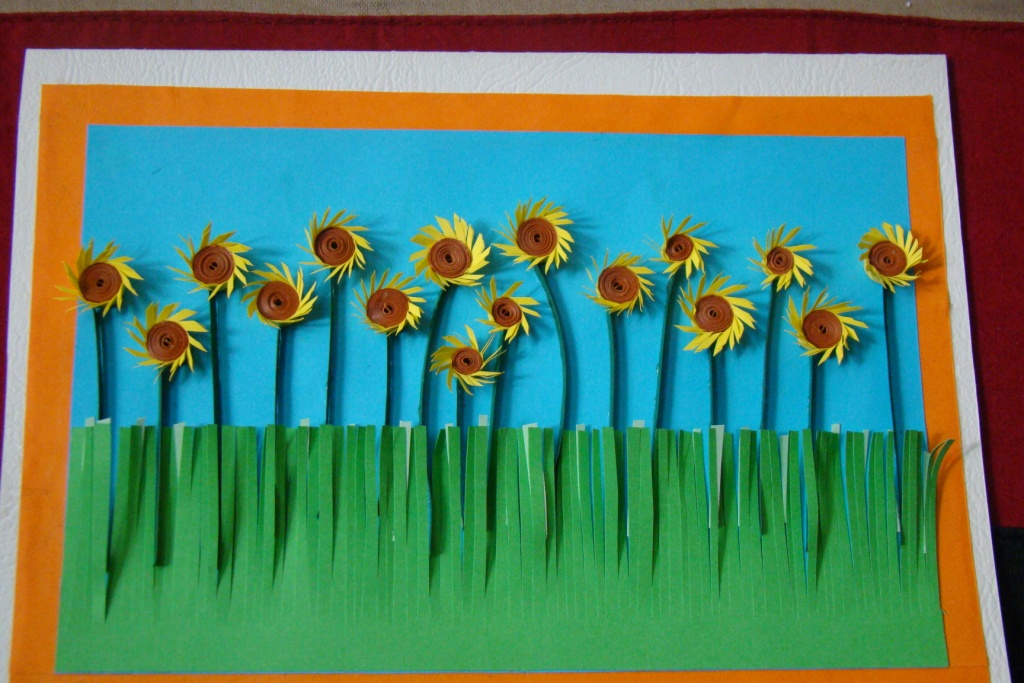
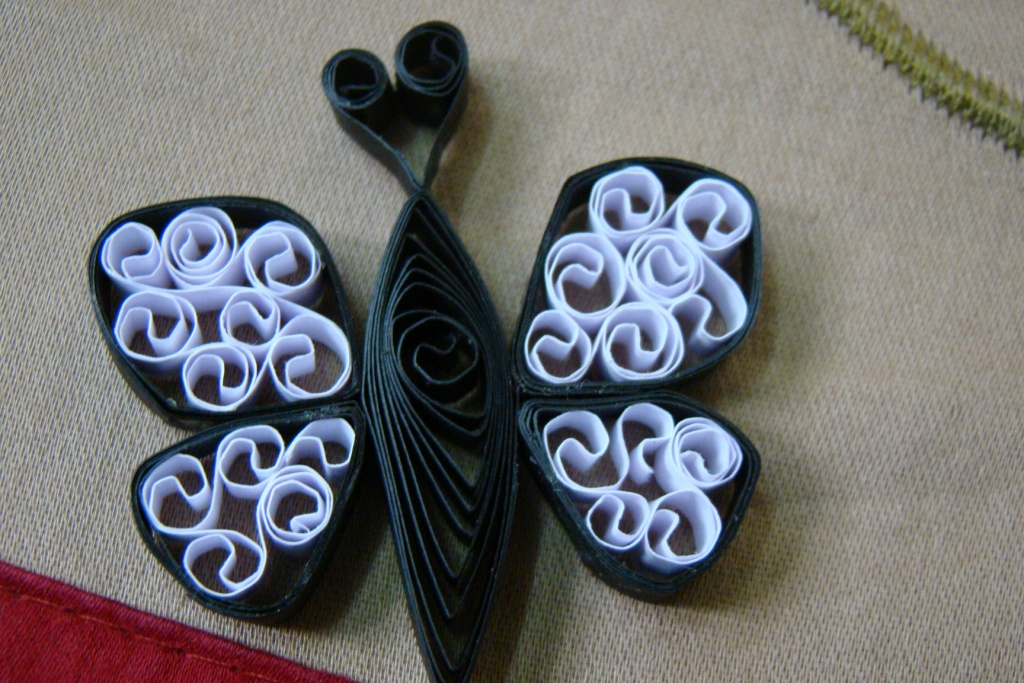
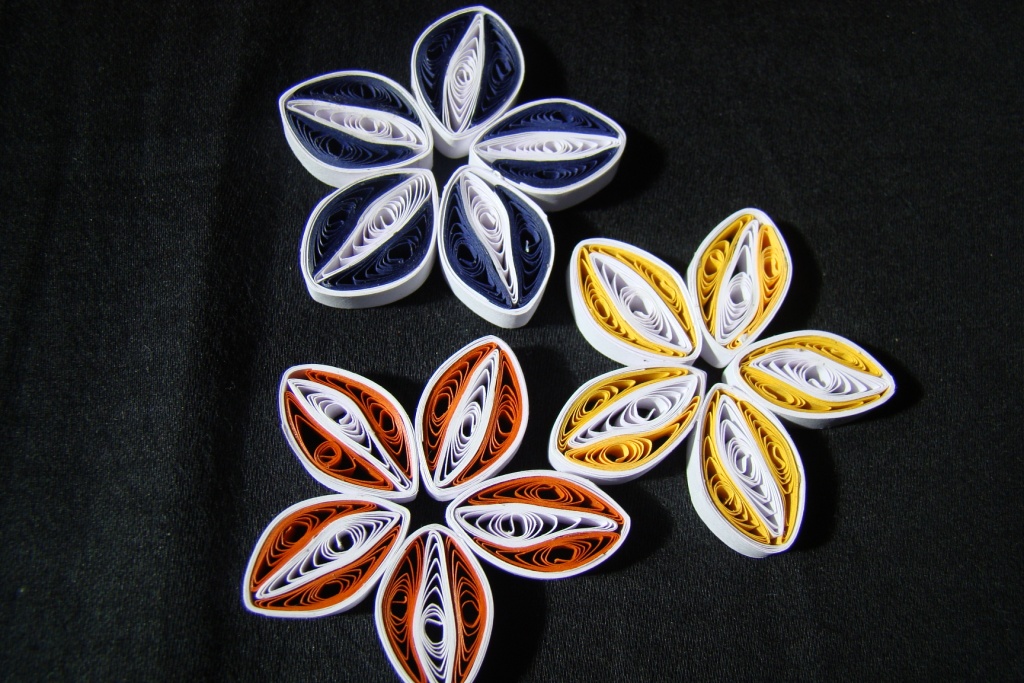
I have been missing so much of your craft and art. Yesterday, I got enough time (read energy too), to log on my blog and check your updates too. However, couldn't comment on each one. But had a fun time seeing all the new stuff by wonderful crafters. Meanwhile, I was also missing my art. As I couldn't bring any art stuff with me, I have started spending little on my art stuff from here and hoping to receive my other collectibles from India. For starters, I just have purchased some scrapbooking kits, designer papers and glue. I have my quilling tools, some punches and embellishments on my wish list. Hope I can get something soon. Cause I really miss my quilking a lot. I miss the curls, the designs and my cardstock.

Anyways, this was from me. I do hope to start my art soon and also whenever possible, keep visiting yours. I love  to see every creation.

Take care and stay connected. Cia....!!! :)

Tuesday, November 6, 2012

Come back

Hello Everyone,

how are you? I am sure everyone's doing just great. Oh, I know I missed so much in these days. I missed all your wonderful creations, lovely crafting and I miss seeing how you did them... I surely would like to catch up on lot many things...
For now, I can say that the reason for me not being able to blog for this long is that I have immigrated to Canada with my husband on Permanent residence basis. Surely, this was a huge step taken by us. It's been more than a month now in Canada but feels as if we been living here for years. The climate is just unpredictable (Just two weeks back it was sunny; The last week windy and this week we have snow flurries....OMG)....

But yes, even here I miss my crafting. I miss all my supplies that I couldn't bring to Canada with me due to luggage limitations; hence I have started hunting craft supply stores. Moreover, in this start up phase, I really don't get enough time to catch up with any crafting activity. But slowly and steadily, I am gonna do my quilling and crafting; not as a vocation but surely as an avoation...

Hope you guys stay around and motivate me with your suggestions and tips...

Thanks again everyone... I love to see your creations... Thanks again for every bit of support you have given...

Saturday, August 25, 2012

Busy Busy Busy!!!

Hello Fellow Crafters,

How are you all doing? I know I am blogging after more than a month.. But there are some things that have come up... Those are simply unavoidable but also VERY VERY important....

So for some more time, I would be missing updating my blog and visiting yours... Once back, I shall continue learning and sharing with you lovelies....

Please bear with me this time... I surely miss you and your creations... Please do save them as I would love to see and learn them.... One request to my followers... Please don't 'Unfollow' me for my absence.. Your following makes me feel that I am also doing something good... Thanks for your generous and kind hearts....


Cya sweeties....

Saturday, July 7, 2012

Come Back!!!

Hello Girlies,
Hows you all doing? Since I was on a BIG traveling, I missed being on my blog and visiting your blog too (for almost a month... Hence it's BIG travellng)... I sure have missed many things. But I hope to catch them all soon.....
Btw, I don't feel like being wordy myself in this post as I want my creations (I did whenever I found time) to speak for themselves...
So here I let my quills do the talking today....
Enjoy the cards swities.....
Card 1 - Rose buds (not in pink or red:-(..) in a Beehived flower vase...

Card 2 - This one came randomly to my mind and made three multicolor flowers of varying sizes...
Card 3 - I simply made the flower and then I saw this video by Pritesh 'Using your shredder well' for different uses of a paper shredder... It was simply awesome.. Hence, here I made something based on the tuts... you can see how beautiful the outcome looks... The curl style on the right bottom is simply superb...... it looks awesome... Thanks Pritesh for the simple yet amazing tuts....


I don't own a Paper Shredder yet but I loved making the cuts with my hand... (Obviously, It was time consuming).... and then I made the stars using silver gel pen... A simple yet amazing way as shown by Pritesh....

Card 4 - The round flower style just popped to my mind while I was working in the kitchen.. I tried it and bingo the result is below... Cut a green color paper with decorative scissors to give it a look of grass... I loved the two ladybug's too.....My DH 'Yumz' says this one is the best of all....


Card 5 - Once I made the round flowers, I thought of trying Sunflowers while giving slant cuts to my quiling strip... And here you see the flowers... They look pretty cool in reality....
Card 6 - The specialty of this card is the border I made using the quilling strips it self.... I don't know how, but the idea just crossed my mind to make a border like that than using a lace or art paper... Looks superb....

Card 7 - This one is based on my early card style in black-white... The combo is suggested by Yumz... Liked it...
Card 8 - This is a simple one but cute......


Card 9 - This is also a simple card but I like the colors....


Card 10 -Red metallic with yellow and cream quills...

Card 11 - This card is inspired by Lulupu... Shruti posted this wonderful Yellow-Black One Minute Fold Card Tutorial... I loved it to core and hence made this pink card... Thanks Shruti....


That's for now girls... I hope you enjoyed it....

If you liked it, please leave a comment...
If you wanna suggest some improvements (sure there are many!!!), definitely leave a comment...
Love to hear from you..
Chao for now...

......:)... Lolz....

Monday, June 4, 2012

Hello Swities,

How's is you all doing... Hope you are not as busy as me. And that's why my absence from my blogs and visiting others too...
Anyways, since I haven't posted anything since last two weeks, I thought of posting on what I have been working on (in the minimalest time I get, I hope if that word actually does exists!... Lolz)....
I have recently just been working of some quills and simple flower making. Actually last week I was also not keeping much well but now fine and back in action (hopefully!!!)...

Without being more wordy, I wanna share my quills with you...

This Beehive technique I learned from simple tutorials by Pritesh. She is a master at quills. I wanted to try something in Black and White and the first flower from top came up. It looks cute. I also made a butterfly on the same lines. The photo follows soon. My personal favorite is the Orange and Blue one... It looks really beautiful in actual....

Another Picture of the beehive flowers......

Here come's the Black-White Butterfly.. It looks cute, isn't it?
A side look of the cute butterfly.....

Next I tired some color combinations and came up with these fringed flowers... I had actually seen the tutorial somewhere but unable to locate the URL... Sorry:(.... But these flowers look really cute... I actually loved the way so many colors turned up.... I even tried to have more than one color for the center of the fringed flowers (You can see in the yellow one and the cream orange one in extreme top right of the picture..)
A closer look....
Next I thought of giving a try to these wonderful flowers I saw here at Syaz Cards. I thought of making in Black and a light yellow combination. It looks amazing in actual...

And how could I forget White too... And hence, made the same flowers in Blue, Yellow and Orange with white combination. See the pics below....


Just made some variations in the sizes.... Thanks Syaz for this idea.. They look AWESOME!!!!

Now if you must have seen  my older posts, I had made a flower in Black outline (Again Black....) with Red and Cream quill fillers... I wanted to try again something on the same lines.. Thankfully, I picked up strips of colors and not just black or white...:(
Here how they look...
Another angle....
That's all for now girlies...
I hope you all like the flowers... If so, do lemme know.....
Also if you can suggest some improvements, Please do lemme know so I can implement them and become better at quilling....
Thanks...
Chao....!!! :)
Kip Smilz.....

Wednesday, May 23, 2012

Hello Swit chums,

How was your weekend. Mine was super fantastic. Just for info, I was out of town to celebrate my First Marriage Anniversary. I could actually get my IPL crazy hubby for a weekend away... It was simply superb. And hence my absence from my blog and also visiting others blog. I am sure I have missed many things but will catch up soon...

Meanwhile, I wanna share this card I made for Yumz on our First Anniversary. They say Paper and Clock are the traditional gifts for First Anniversary. What better that a hand-made card.

To begin with, this is not a high fundu card. It's a simple card made with whatever I had hand. Also it was a surprise for him and hence, made this card when he was not around. I initially thought of making a simple card. But then these wonderful Fold card styles at Lulupu helped me to think something different and hence I made a plus sign '+' card.

Without me being more wordy, please find below my card with additional remarks.

This is the first snapshot. If you see, it's a copper color cardstock I have used. It has a metallic finish to it which looks quite good for this occasion. I made a band of a copper color lace with a quilled flower stuck to it. This band keeps the card folds in place.


Once we move the band, the card looks as above. Since I don't own a Scallop punch yet :(... I hand cut the circles in different color papers with designer scissors. Surely You can see the circles are not to the mark but still acceptable. Moving on, I used a White pen for simply writing down 'Happy Anniversary'. White looks good on this metallic finish. And a simple 'YD'....

Moving on to my first flap,
I simply stick a Pink color paper on the cardstock. Then I randomly selected some color quilling strips and stuck them in different angles and wrote down one liners in different color pens. As you can read here, 'Loving - Always and Forever'; 'Smiling and Happily ever after'; 'Having a Pillow fight in the bed'; 'Awesome Badminton Challenge won (By D)' and so on.... Please don't mind my finger holding down the card....

My second flap is,


I stuck a blue cardstock and then I used a cardstock I ordered from LULUPU... It's a cute cardstock.. Just cut out a sentiment which says "Life is".. and then I added words in my calligraphic style as With you, Life is.... 'Beautiful', 'Wonderful', 'Darling', 'Shona', 'Smiling', 'Happy', 'Classy', 'Sexy'... and so on as you read here....

My next flap is

The center CS is again from LULUPU. I cut out a square and stuck it in a diamond shape. I then added these embellishments I bought from a local store.. They look cute here....

My last flap,

I had seen this technique when I was a kid and my sister's friend was doing this. She simply moved her paper over a candle and what you get is Black prints like smoke. Here, I even moved my finger over the entire smoky look else it would have left marks on my copper CS and hence you see a greyish white look. Accidentally, a dot of wax fell on my smoke print and I liked it. Hence, I did it on purpose for other wax dots. It just gives a simple yet different look than my other flaps.

And now the center card look,


I had this Heart shape punch outs with me. I colored the heart in different colors to add some colors on this center card as I have used only white mostly here. I thought to add it in the center and then stuck some white color velvet flowers I got locally. They just add uniqueness to the already cute heart. Also, I gave this 'White Stitch' look border to this center CS. It's cute, infact according to me, the best part of the center card.

And here's the look of the overall card,
The band in the corner, the four flaps out and the center Heart. A plus '+' sign card.

Some more pics here,

The pink flap with the random one liners..... I have purposefully used a pink because I love pink and Yumz just loathes it.... heheheheh... Just to tease him!!!


The calligraphy style I used is 'self learning'. Yumz love my handwriting. So thought of adding it here.


The center Colored heart.....

The cross look of my quilled flower. I made these flowers just to try a technique and it looks good I think. I am not sure if any quiller out there has tried this technique. If so, I would love to see it... Cause I loved this style.. Just cute. I made it in Pink and Blue shade as well..

I hope you liked this card. As I said, It's a simple card. What matters is the emotions and love put in it while making... And about Yumz, he is bowled over with this card and then, CSK winning the First Eliminator match on the 23rd May, 2012. Oh BTW, we celebrated our First Marriage Anniversary on the 21st May, 2012. It was a fun weekend...

Cya dolls.. Keep coming back!!!

Sunday, May 13, 2012

Hi Dolls,

How is you all?
Hope you had a great sunday. Mine was simply superb...
Since it was a second saturday, I had the weekend to myself. I had already booked the saturday for shopping for some good cardstock and some punches. (and thankfully, my hubby was all the more excited than me)
Anyways, once I got my shopping done to my heart's (and wallet) content, I started to make some greetings. This sunday I had thought of making some simple cards and here they are. This idea was an inspiration drawn from Dr. Sonia and her simple card making style.

This is card no. 1
The flower was not actually meant to be a flower. I had made these seprately for a different project but couldn't use it there. When I was done with the background cardstock for my greeting, I thought of checking my stash for some readymade shapes and found these five colorfull of them. I placed them like a flower and showed to my hubby (Yumz). He liked the idea and asked me to place a dark red color ribbon in the bottom part as you can see on the card. The puches are made by my new punch I got for myself.

A closer look of the flower from sideways. (please don't mind the picture quality. I didn't had my Sony with me and had to work with Yumz's BB)
Next one is a simple yet cute one.


 Courtsey: Yumz for the Red-Black flowers. Myself for the Cream-Black flowers. I am sure both make a lovely combination.  For the flowers I thought of making a beehive. But don't know what got into my mind (surely something good only) and I just rolled the strip and placed it in the black casing I made. And voila, it looked very preety.

Yumz asked me to keep the centre as it is cause it creates a cute star and I definately (now) agree with him. The hearts are punched out from my new punch got on Saturday. Lovely na?


A closeup look of the flower....

I am linking this card to Mishelfloschallenge - Celebration.

Next one is a special one:

I always wanted to try a window card, though I was not so sure how do you make them. But still wanted to try one with my own measurements. I am not good with maths and drawing straight lines but here comes Yumz in the picture and helps me out.... As always I guess....
Once the frame was ready, I made the metallic maroon curls and pasted them as above. My mother-in-law (PR) was observing me. I then was thinking what to do next. Suddenly she suggested me to make small curls of blue and place them on the bigger curve. Mind it, she is also from Arts (Lucky me)...
I thought it surely would look classy. I made the tiny curls and placed them. She also then suggested to segregate and place a few on the bigger curls curve. And then the pearls was again her idea.

I think I just did execution in this card. The design-head behind this is my mom-in-law PR. She deserved it after all Sunday was Mothers' Day.......


Another pic.....


So here it all goes girlies....

Hope you all had fun art and quilling time this sunday.
Would love to hear suggestions, improvements or any appreciation from you all. Also leave your blog address so I can visit and see your masterpeices too....

Chow!!!